Why Does My Thermostat Keep Going Up? Expert Solutions That Actually Work
Have you ever woken up feeling uncomfortably warm, only to discover your thermostat reading has mysteriously jumped from 67 to 70 degrees overnight? If you’re wondering why does my thermostat keep going up, you’re not alone. This frustrating issue affects many homeowners, with some even reporting unexpected temperature increases from 71 to 78 degrees during the night.
Fortunately, with over 10+ years of experience dealing with thermostat issues, we’ve identified numerous reasons why thermostats keep changing on their own. From outdated programming and battery failures to incorrect placement and system malfunctions, the causes can vary significantly. In this comprehensive guide, we’ll walk you through the most common reasons for thermostat problems and provide practical solutions to help you maintain your desired temperature settings.
Common Reasons Why Thermostats Keep Changing Temperature
When your thermostat keeps changing temperature unexpectedly, several underlying issues could be at play. Let’s examine the most frequent causes of this frustrating problem.
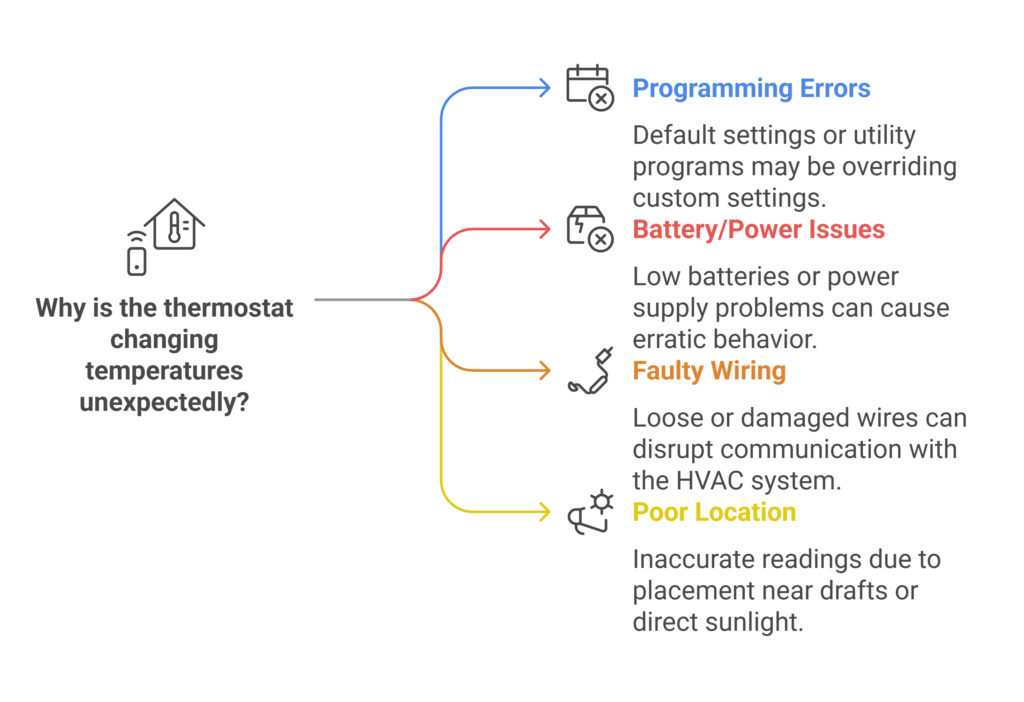
Programming errors and schedule conflicts
Many thermostats come with manufacturer preset programs that automatically adjust temperatures throughout the day. Specifically, if you haven’t updated these default settings, your thermostat will continue reverting to its factory programming. Furthermore, energy-saving programs from utility companies can override your settings during high-demand periods.
Battery and power supply issues
Dead or dying batteries rank among the most common causes of erratic thermostat behavior. Modern digital thermostats can operate for up to a year on fresh batteries, but when power runs low, several warning signs appear:
- Display screen dimming or freezing
- Incorrect temperature readings
- Random system cycling
- Continuous AC operation without shutoff
Additionally, wired thermostats might experience problems due to tripped circuit breakers or blown fuses. A tripped safety switch, often triggered by excess moisture or electrical issues, can also interrupt power supply to your thermostat.
Faulty wiring connections
Loose or damaged wiring creates serious communication problems between your thermostat and HVAC system. Moreover, incorrect wire connections at color-coded terminals can cause temperature regulation issues. Consequently, even if wires appear properly connected, they may need firm reseating to ensure stable operation.
The location of your thermostat also plays a crucial role in its performance. Direct sunlight, cold drafts, or proximity to heating sources can cause inaccurate readings. For instance, most thermostats installed on the first floor only collect temperature data from their immediate surroundings, potentially missing temperature variations in other areas of your home.
How to Diagnose Your Thermostat Problems
Diagnosing thermostat problems requires a systematic approach to pinpoint the exact cause of temperature fluctuations. Initially, let’s explore the most effective methods to identify and resolve these issues.
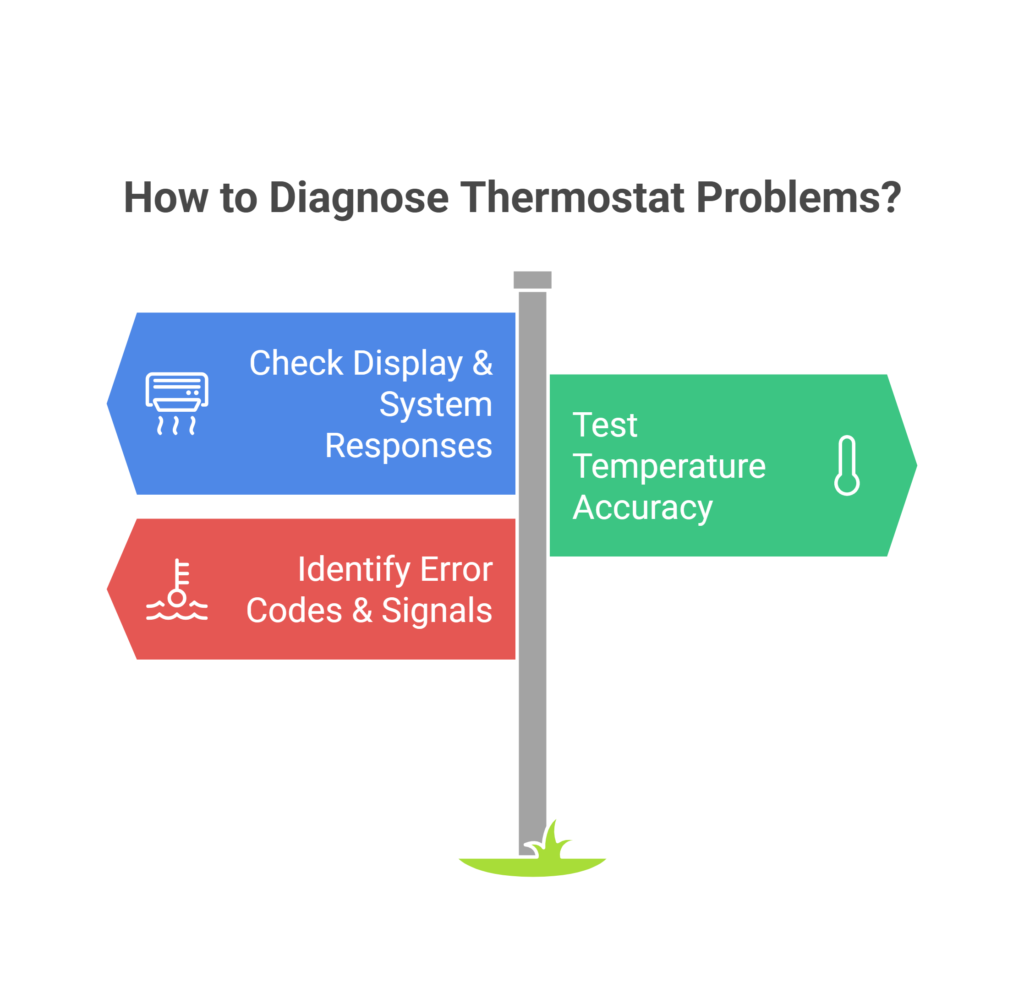
Checking display and system responses
Start by examining your thermostat’s display screen for any signs of dimming or blank sections. Subsequently, verify that the device hasn’t been accidentally turned off, as this simple oversight often causes temperature control problems. A quick power check involves testing the batteries and ensuring the circuit breaker hasn’t tripped.
To test system responsiveness, raise the temperature setting by five degrees or more – your furnace should respond almost immediately. Meanwhile, if you notice delayed responses or irregular cycling, this might indicate underlying communication issues between your thermostat and HVAC system.
Testing temperature accuracy
Precise temperature readings are crucial for maintaining comfort in your home. To verify your thermostat’s accuracy, follow these steps:
- Place a reliable thermometer on the wall near your thermostat (about 3-4 feet away)
- Ensure the test area isn’t exposed to direct sunlight or drafts
- Wait 20 minutes for the readings to stabilize
- Compare the temperatures on both devices
A difference of three degrees or less is generally acceptable. However, if you notice larger discrepancies, your thermostat likely needs cleaning or recalibration. Primarily, use a soft brush or compressed air to remove any dust from the vents and internal components.
Identifying error codes and signals
Modern thermostats communicate problems through specific error codes and warning signals. A triangle with an exclamation point typically indicates system alerts. In particular, blinking patterns can reveal various issues:
- A blinking “Heat On” or “Cool On” indicator suggests communication problems with the HVAC system
- A flashing “Low Battery” warning requires immediate battery replacement
- A blinking “Furnace Error” might indicate clogged filters or dirty blower fans
Upon encountering these signals, check your thermostat’s display for specific error codes. Most manufacturers provide detailed documentation to interpret these codes, helping you determine whether the issue requires professional attention. Notably, some error codes might prevent system testing during extreme weather conditions to protect your HVAC equipment.
Step-by-Step Troubleshooting Guide
First of all, let’s tackle the hands-on solutions for your thermostat issues with proven troubleshooting steps that actually work.
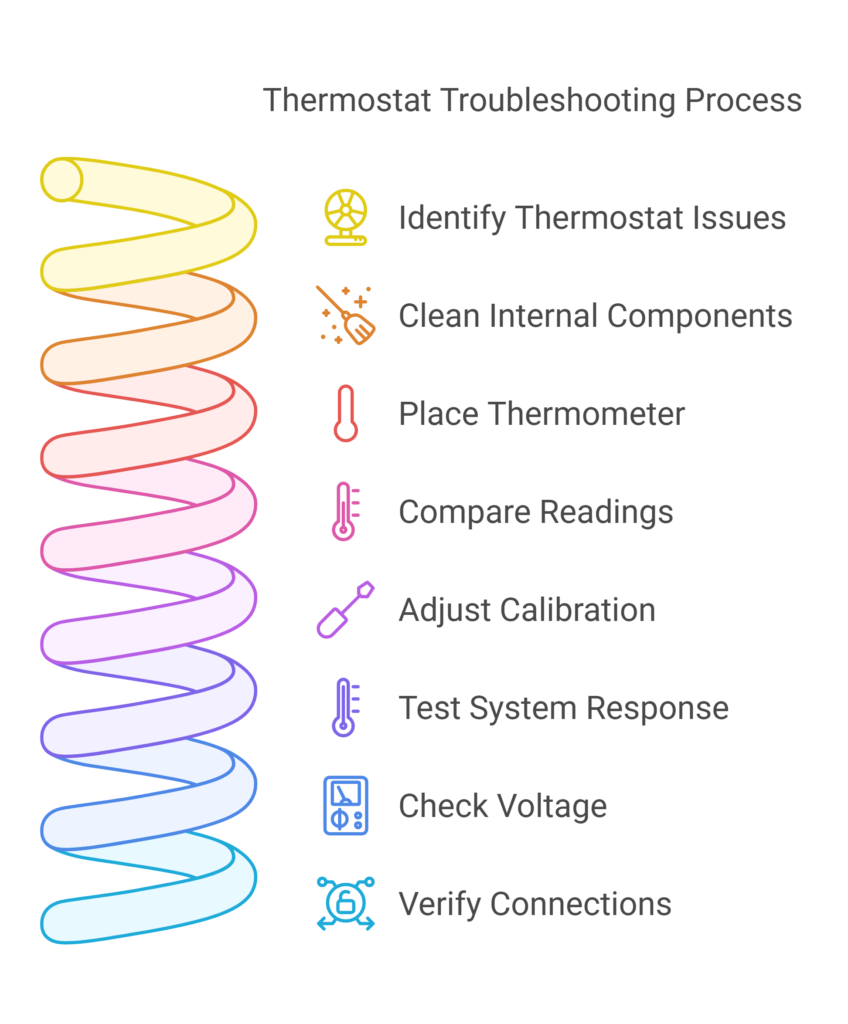
Basic reset and recalibration steps
Accurate calibration ensures your thermostat maintains precise temperature control. To recalibrate your device, follow these essential steps:
- Clean the internal components with a soft brush or dollar bill to remove dust
- Place a reliable thermometer near the thermostat
- Wait 15 minutes for temperature stabilization
- Compare readings between devices
- Adjust the calibration screw located inside the curved metal piece
Remember to turn off power at the circuit breaker before opening your thermostat. Primarily, if readings vary by more than a few degrees, recalibration becomes necessary.
Testing system components
Following that, check your thermostat’s functionality by performing these critical tests:
Set the temperature 5 degrees above or below the current room temperature to trigger heating or cooling cycles. Accordingly, observe if your HVAC system responds within a reasonable timeframe. For advanced testing, use a multimeter to measure voltage at connection points.
Essential component checks include:
- Verifying wire connections are secure
- Testing battery contacts for corrosion
- Examining the mercury vial’s alignment (if applicable)
When to replace batteries or components
Batteries typically need replacement once yearly, although certain warning signs indicate earlier replacement:
- A completely blank display screen
- Unresponsive controls
- Random temperature fluctuations
For battery replacement, carefully remove the thermostat housing – often by sliding it upward from the mounting plate. Essentially, use a flat-blade screwdriver if needed to access the battery compartment. Always check the proper battery orientation before installation.
Important: Never install old or rusty batteries, as they might leak and damage your thermostat. For vacation homes or extended absences, replace batteries before leaving to prevent unexpected shutdowns.
If problems persist after component testing and battery replacement, consider upgrading to a newer model. Smart thermostats require more power for advanced features, so ensure proper C-wire installation or consider professional installation for optimal performance.
Professional Repair vs DIY Solutions
Deciding between DIY repairs and professional help requires careful consideration of your thermostat issues. Let’s explore which problems you can tackle yourself and those that need expert attention.
Which problems you can fix yourself
Many common thermostat issues respond well to DIY solutions. Primarily, you can handle basic maintenance tasks like replacing batteries, cleaning internal components with a soft brush, and checking for loose wire connections. Rather than immediately calling for help, try these proven DIY fixes:
- Replace batteries annually or when display dims
- Clean dust and debris using compressed air
- Tighten loose wire connections with a screwdriver
- Reset tripped circuit breakers
- Verify proper mode settings
When to call an HVAC technician
Nevertheless, certain situations demand professional expertise. Indeed, you’ll need a certified technician particularly when dealing with:
Complex wiring problems that could void your warranty if handled incorrectly. Unauthorized repairs or DIY attempts often lead to warranty invalidation, leaving you responsible for future repair costs. Professional HVAC technicians bring specialized knowledge and tools to diagnose and fix issues without compromising your system’s integrity.
Cost considerations and warranties
Understanding repair costs helps make informed decisions about DIY versus professional solutions. Professional thermostat repair typically costs between USD 100.00 to USD 330.00. HVAC technicians charge USD 50.00 to USD 100.00 per hour for labor, while routine maintenance visits range from USD 85.00 to USD 170.00.
Warranty coverage significantly influences repair decisions. Most warranties require installation and repairs by certified contractors to remain valid. Using non-original parts or attempting unauthorized repairs can void your warranty protection. Therefore, while DIY repairs might seem cost-effective initially, they could lead to more expensive problems if warranty coverage is compromised.
Consider these factors before deciding:
- Current warranty status and terms
- Complexity of the repair needed
- Cost comparison between DIY parts and professional service
- Risk of voiding manufacturer guarantees
Regular maintenance by authorized technicians helps maintain warranty coverage and system efficiency. Professional installation ensures proper system compatibility and adherence to manufacturer guidelines, ultimately protecting your investment and ensuring optimal performance.
Preventing Future Thermostat Issues
Proper maintenance and strategic placement of your thermostat serve as the foundation for preventing unexpected temperature changes. Let’s explore proven strategies to keep your thermostat functioning reliably.
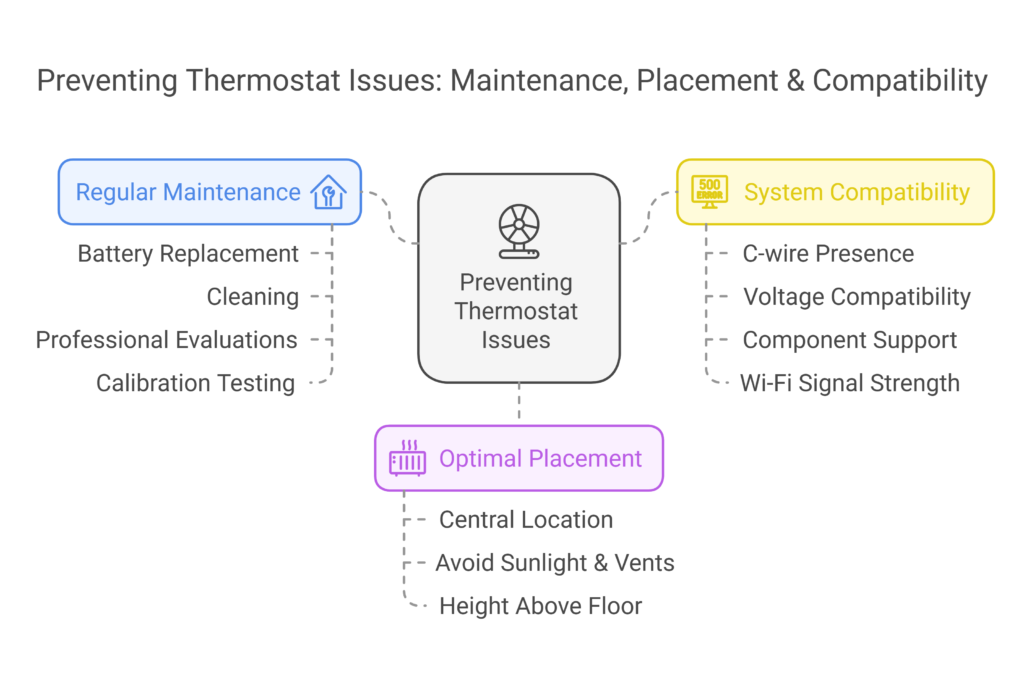
Regular maintenance tips
A well-maintained thermostat typically lasts about 10 years. Primarily, replacing batteries every six months keeps your device running smoothly. In addition, regular cleaning plays a vital role – dust and debris can significantly affect your thermostat’s accuracy, potentially increasing energy costs by up to 7%.
For optimal performance, implement these maintenance practices:
- Clean internal components every few months using electrical contact cleaner
- Tighten loose connections with a screwdriver
- Schedule annual professional evaluations
- Test calibration by comparing readings with a reliable thermometer
Optimal thermostat placement
The location of your thermostat ultimately determines its ability to maintain consistent temperatures. Mount your thermostat approximately 150 cm above the floor. As a result of incorrect placement, your energy bills might increase unnecessarily.
Your thermostat requires installation in a central area that accurately reflects your home’s average temperature. Typically, the living area downstairs offers better temperature control than upstairs locations.
Avoid placing your thermostat near:
- Direct sunlight or large windows
- Supply vents or drafty areas
- Heat-generating appliances or electronics
- Hallways or rarely used spaces
System compatibility checks
Understanding system compatibility prevents future complications. Smart thermostats need constant power through a C-wire for proper operation. Without this essential component, your device might experience erratic behavior or fail to maintain consistent temperatures.
Most modern thermostats work with various heating sources, including gas, oil, and electric systems. Yet, certain limitations exist – high voltage systems (120V or 240V) often prove incompatible with standard thermostats.
Before upgrading your thermostat, verify:
- Presence of a C-wire for smart thermostats
- Voltage compatibility with your HVAC system
- Support for additional components like humidifiers
- Wi-Fi signal strength in the installation area
Remember that incompatible thermostats may lead to expensive repairs and system damage. For uncertain situations, consulting an HVAC technician ensures proper matching between your thermostat and heating system.
Conclusion
Understanding why thermostats keep changing temperature empowers homeowners to maintain comfortable indoor environments. Though thermostat issues might seem complex, most problems stem from simple causes like battery failures, programming conflicts, or placement issues.
Regular maintenance stands as your best defense against unexpected temperature changes. Simple actions like battery replacement, careful cleaning, and proper positioning help prevent most common problems. Additionally, knowing when to attempt DIY fixes versus calling professionals saves both time and money.
Remember that your thermostat serves as the control center for your entire HVAC system. Therefore, addressing issues promptly prevents minor problems from escalating into major repairs. While many fixes work well as DIY projects, complex wiring issues or warranty-related concerns require professional attention.
Smart preventive measures, combined with proper maintenance, typically extend thermostat life beyond 10 years. Should problems arise, start with basic troubleshooting steps before considering replacement. After all, maintaining optimal thermostat performance ensures both comfort and energy efficiency throughout your home.